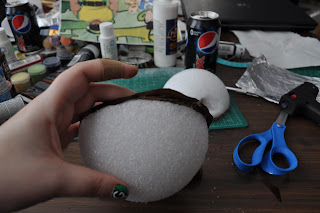
So first of all you'll need a big styrofoam ball. Here is my husband modeling it.
I used dress tape to create a line around it where aproximately I wanted to cut it in half. It didn't give me a straight line, but that was no matter, because after that I cut it in half with a big ole hobby saw.
Notice the crumbly bits stuck to the knife? That is how everything looks that comes in contact with this stuff. Do not do this anywhere you are afraid of getting dirty.
I purposely did not cut it in equal halves because the Momo puppet head is not divided equally in half. The top half for the head is bigger.
Next, I lined it up onto an old cardboard box. Thank you used priority mail box, you've gone through the mail and now you will be a puppet mouth. I traced around each half and cut out the cardboard disks.
Then I hot glued the disks to the foam halves.
Now I know it's hard to see in this picture, so you may have to click to enlarge, but I traced the aproximate width and height of my fingers onto the foam halves. This is so I could figure out what I would need for a perfect puppet hand grab. The person who's getting this has much more slender hands than I, so what is snug on me will be great for her.
Next, carve the holes for the hands. Don't worry if you dig shallow enough to find the cardboard. It will be fine as long as it's not showing cardboard right at the edge entirely. Make sure to get it deep enough that your hands are comfortable in there and that you don't have just barely your fingertips in there. I used an exacto knife and a pair of needle nose pliers to dig this out.
See how comfortably my hand fits in there.
Next trace around your halves again on the side of the fabric not seeing the public and make sure to leave a little bridge between the two halves. This will be your hinge for the mouth.
Then cut it out. Leave a quarter of an inch around the lines when you cut it so it overhangs when you glue it.
Next, glue it on. I suggest gluing a ring on the cloth on the lines you drew and then aligning the cloth to the cardboard.
Then you want to glue the excess cloth down to hide the cardboard. This way when you apply the white fur, you hide your mouth edge a bit.
It should look like this once glued.
Next get some thin scrap cloth. You want to have it just so that you're not dealing with crumbly bits all the time. Take some hot glue and pour it lightly on the inside of your holes and then quickly cram the cloth in there so it goes over your hand like a glove. Make sure to have your hot glue gun on the lower heat setting to not burn yourself. You should apply it so that your hand fits comfortably inside even with the cloth. Then glue the excess edges down. I should make a note for people to use light colored scrap fabric since this will be under white fake fur.
Next cut out two identical tomb stone shaped pieces to make the tong. I know I have a glue line down the center in this image, but that was me trying to do a technique that didn't work. Just take the side you want to be seen (the good side) and make a glue line out towards the edge on all of the curvy part. Ten lay the good side of the other piece onto that and press down. It should remind you of a garnment that is inside out. Once you're sure the glue is set, turn it right side out and glue the straight edge shut. Then put a glue line on the edge you just sealed and fold it over a little bit so that the old straight edge can't be seen. That will be the underside of the tongue.
Then put a glue line on the folded over part on the bottom and put it into the back of the mouth. Make sure you get that on the bottom half and not the top. I almost did. Then use some sort of permanent medium to draw a line down the center of the tongue but not all the way down to the curved edge.
This is as far as I have gotten because I ran out of hot glue. Expect more soon since I picked more up tonight after dinner.
Also, thank you for not minding the Pepsi Max Product placement. It is not intentional. It just didn't occur to me to move it so it wasn't in the shot.
~Lumie


EEEEEEEEEEEEEEEEEEEEEEEEEEEEEEEEEEEEEEEEEEEEE
ReplyDeleteThat is all.
Can't wait to see the final!
ReplyDeleteJust finished.
ReplyDelete